DECEMBER 2
|
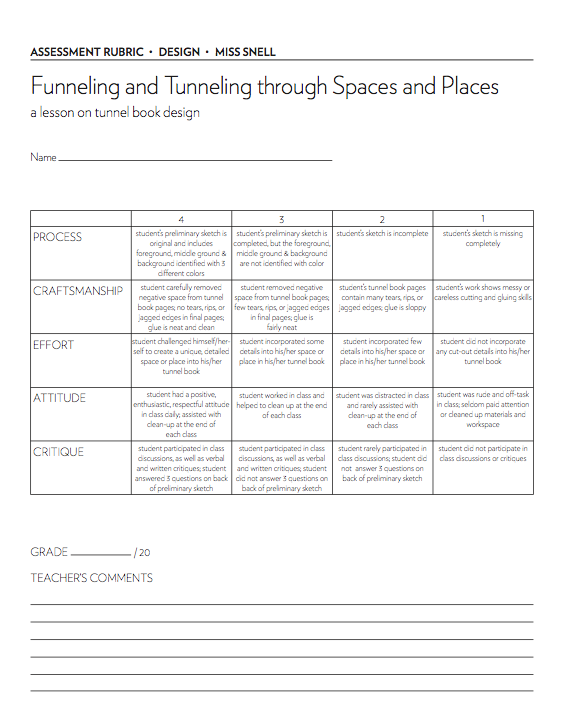
BOOKMAKING & BOOKBINDING Bookbinding is the process of physically assembling a book from a number of folded or unfolded sheets of paper or other material.
A FEW TYPES INCLUDE... Accordion fold Coptic binding Hardcover Herringbone Japanese bindings Saddle stitch Tunnel books French fold X fold Altered books BOOK 1: X FOLD1. Select 1 sheet of magazine paper, cut to size.
2. Fold in half vertically once. Then, fold in half once horizontally. When folded horizontally, fold in half horizontally once more. Refer to the image below, and make sure your page is folded where you see the gray lines. Make sure all folds are neat and precise. 
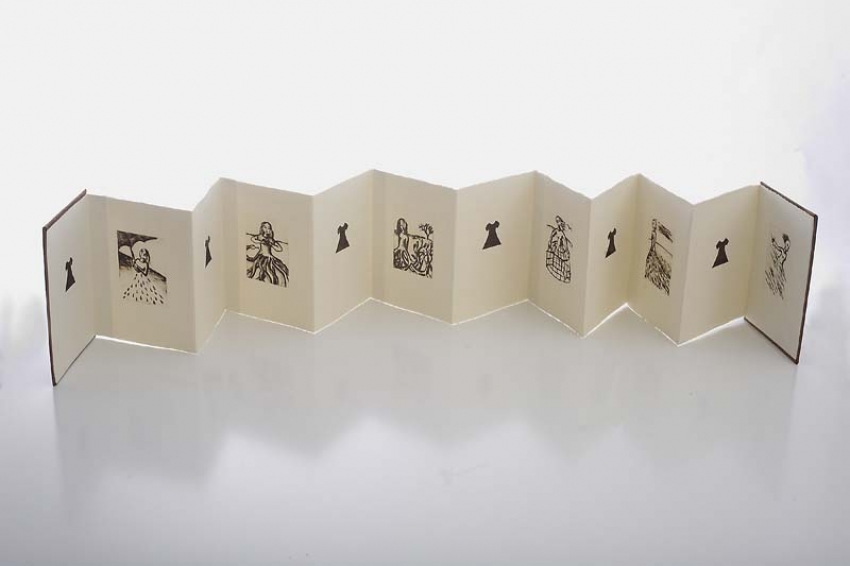
3. Unfold your paper, and lay it flat on the table. Use an X-Acto knife to carefully cut a straight line on the vertical fold between the first and last horizontal folds. Refer to the red line in the diagram above. * X-Acto knives are sharp! Be careful. Place a cutting mat underneath your magazine sheet. Align a metal ruler to the fold on which you are about to cut. Hold the ruler down with your left hand, making sure your fingers are not in your cutting path. Hold the X-Acto in your right hand, and slide it alongside the metal ruler as you cut through the magazine page. Cut slowly, as your magazine page is very thin and prone to ripping. 4. Fold your page in half vertically. Hold onto one side of your folded sheet with your left hand and the other side with your right hand. Push your hands towards each other, and your folded sheet should look like an X from above. Bring your hands together, and your folded sheet should become a miniature book with 6 inside pages, a front cover and a back cover. Refer to the slideshow to the right if necessary. 5. Use a writing utensil of your choice (Sharpie, ballpoint pen, pencil or colored pencil) to add content to your book. Here's the catch -- the content you add must be hidden amongst the content that is already on the magazine page. Carefully observe the colors, patterns, images and text throughout your 6-page book. You may add anything, just make sure it's hidden. For example, you may consider adding words to areas of text already there to change the meaning of a sentence or add titles to images without them. Be creative! |
|
DECEMBER 3-6
|
PARTS OF A SPACE
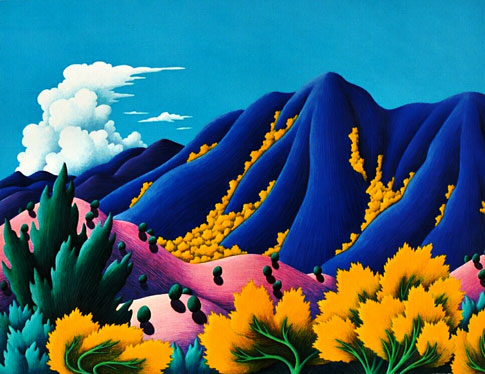
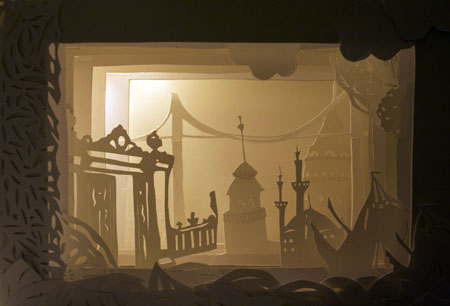
FOREGROUND the part of a view that is nearest to the viewer MIDDLE GROUND the part of a view between the foreground and background BACKGROUND the part of a view that is farthest from the viewer Can you identify the foreground, middle ground, and background of the drawing to the right? TUNNEL BOOKSTunnel books consist of a set of pages bound with paper strips on 2 or more sides. Openings in each page allow the viewer to see through the entire book from the front to the back, and cut-out images on each page work together to create a three-dimensional scene.
ORIGINS The term "tunnel book" dates back to the mid-19th century. Tunnel books were originally made to commemorate special events, and the name is derived specifically from the building of the tunnel under the Thames River in London, the first one to have been constructed successfully underneath a navigable river. Since then, other tunnel books have been made to commemorate other special events in history, such as the New York World's Fairs. GATHERING IDEAS1. Brainstorm a space or a place that is special or memorable to you. Include as many details as possible (patterns, textures, people, etc)
* Choose one idea from the following list as a starting point. - An image of a dream you had - A look into nature (ex. underwater, in a forest, etc) - A look inside your house, your school, a store or other building 2. On a small sheet of white drawing paper, sketch your space or place. Your drawing must show depth, so be sure that your drawing includes a foreground, middle ground, and background, as we've discussed in class. The more depth you include in your illustration, the more exciting your tunnel book will be. 3. On the back of your sketch, respond to the following questions: 1. What space or place did you draw? 2. What makes your space or place special or memorable? 3. Which elements in your sketch make up the foreground, middle ground, and background? 4. Choose 3 colored pencils. Outline each part of your drawing (foreground, middle ground, and background) with a DIFFERENT color. SKETCHBOOK ASSIGNMENT: DUE DECEMBER 11Develop at least 3 small sketches of your ideas for the CommUnity Involves You 2014 Poster Contest. Think outside the box; be creative! Use words and images to express your idea. Focus on a clear message that will attract viewers' attention. See below for full details on the contest!
CommUnity Involves You 2014 Poster Contest The Middlesex District Attorney’s Office and Middlesex Partnerships for Youth, Inc. invite high school and middle school students to create their own poster promoting the importance of being involved in the school and community. The goal of the 2013-2014 Poster Project is for students to develop original posters to highlight the community aspect of school and the various opportunities available to students. These messages will communicate a direct, positive voice to other teens, in an effort to demonstrate to students that they are valued and that their involvement matters. Possible topics for the posters include: - Ways for students to get involved in their school and community - Healthy relationships that can form within the community - How involvement in the school and community builds opportunities - Positive impacts students can have on the school and community Deadline for submissions is January 3, 2014 BOOK 2: TUNNEL BOOK1. Take a stack of 5 sheets of 5 1/2x7" oak tag.
2. On each sheet, write your initials small, in pencil, on one side. On the other side, with a pencil, draw a line 1/2" away from the edge of the page on all sides. This 1/2" space around the perimeter of your page will stay blank -- you will write on or not cut anything out of these sections. 3. Your drawing should be divided into 3 layers -- foreground, middle ground, and background. Each layer will be drawn on a separate sheet of oak tag. 4. Use an X-Acto knife to carefully remove the negative space from your drawing. Begin with cutting out the foreground image on the first sheet of paper, and work your way to the background. DECEMBER 9-10TO DO LIST
1. Continue working on your tunnel book.
- Complete your sketch. Outline the foreground, middle ground, and background each with a different color. - Answer the three questions on the back of your sketch. - Select a stack of 5 sheets of oak tag. On 4 sheets, measure a 1/2 inch border. One sheet will have no border -- this will be the back sheet of your book. Draw your foreground, middle ground and background, each on a separate sheet. One sheet will have just a border, and no drawing. Include as many cut-out details as possible in each sheet. 2. Reminder: Sketchbooks are due on Wednesday! DECEMBER 11TO DO LIST
1. Tunnel Book Rubric: receive & review 2. Sketchbooks: critique 3. Continue working on tunnel books; add color if cutting is complete. DECEMBER 12-13As you continue working on your tunnel books, keep the following questions in mind:
- Am I using an X-Acto knife to cut out small details in my space or place to create texture and add interest to my overall composition? - Does my composition contain a clear foreground, middle ground and background? - Would my book be more successful with the addition of color, or do I prefer it without color? SKETCHBOOK ASSIGNMENT: DUE DECEMBER 18 Select one of your sketches from your last sketchbook assignment to develop into a final poster for the CommUnity Involves You competition. Remember, you may use your sketchbook OR your iPad to create this poster. Do your best to make a unique, original poster. How will your poster stick out from the rest? The image on the right is from a similar competition. It was made by a student for BHS' Anti-Bullying Week last year. DECEMBER 16-19When your tunnel book is complete, answer the following questions in complete sentences on your iPad, and e-mail them to me at [email protected].
Tunnel Book Critique (Your Name) 1. What was the inspiration for your tunnel book? 2. What was the hardest part of the tunnel book process? 3. Which part of your tunnel book are you most proud of? Is there anything you wish you could change? DECEMBER 20Today we will go downstairs to "Holiday Traditions" to learn about how different cultures celebrate the holidays. As a class, we will stay downstairs for 20 minutes, and then we will come back to talk about what we learned.
"HOLIDAY TRADITIONS" 1. What are three facts you learned about three different cultures? HOMEWORK ASSIGNMENT: PHOTOGRAPH A COLOR WHEEL DUE: JANUARY 8, 2014 Demonstrate your understanding of the color wheel by creating a photograph of objects that are arranged to create an accurate color wheel. 1. Read this link: http://www.colormatters.com/color-and-design/basic-color-theory in order to understand the color wheel and the following terms: Primary, Secondary, and Tertiary Colors. 2. Collect objects that illustrate all of the colors on the color wheel, and arrange them in a circle on a white or neutral colored background. 3. Photograph the objects using your iPad. You may not use photographs of object color wheels from the internet. 4. Take multiple pictures in various types of lighting, select the strongest image, and crop and/or edit it if necessary. JANUARY 8-10COLOR STUDY OF A FAMOUS PAINTING
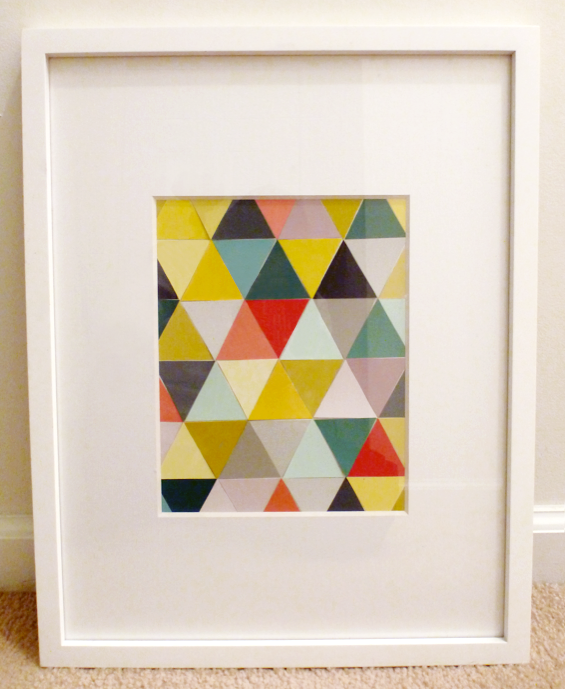
1. I will provide the name of a famous painting/print for each of you. The artwork we will be studying is by a collection of famous artists: Kandinsky, VanGogh, Warhol and Hockney.
2. Pull the image of the artwork up on your iPad. Use the Notability app to divide your artwork into rows and columns. Then, divide each square/rectangle into 2 triangles. 3. Use a paint swatch book to find colors you see in your painting. You will cut the individual colors into triangular shapes using scissors, matching the colors you see in the triangles you divided in step 2. 4. Use a glue stick to paste the triangles onto a piece of oak tag. DUE JANUARY 15 JANUARY 15EVALUATION
Please fill out the evaluation provided in the link below so I can learn ways I can improve as a teacher! https://docs.google.com/a/bpsk12.org/forms/d/15qx59BXueP8bzmKsixNfxnKbMEvnrbU9kyEc7EmRQN0/viewform |
colored pencil landscape drawing by Reina, 16x21"
Paper cutouts, Bovey Lee

|
